
Mary Berry Mini Christmas Cakes to Delight Your Holiday Spirit
Why Make This Recipe
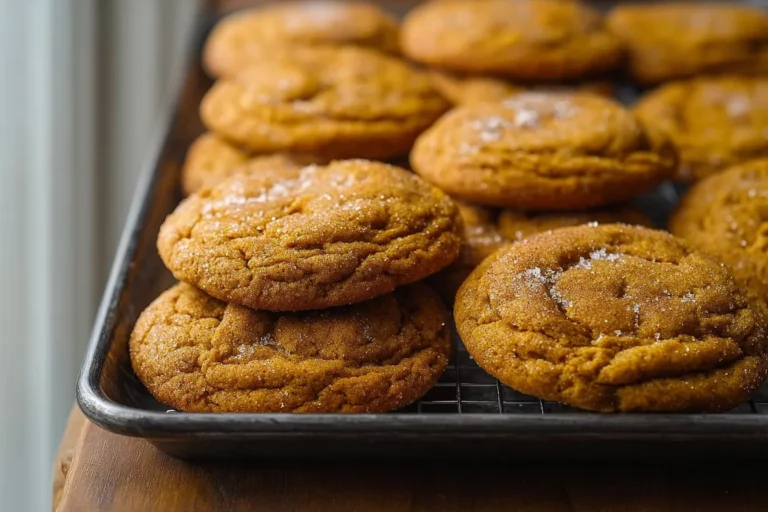
The holiday season calls for celebrations and sweet treats. Mary Berry Mini Christmas Cakes are a perfect choice for adding cheer to your holiday spirit. These small, delicious cakes are not only beautiful to look at but also delightful to eat. They are packed with flavors that remind you of Christmas, with a mix of spices and dried fruit that create a warm, comforting taste. This recipe gives you the opportunity to share lovely homemade gifts with family and friends, making your holiday gatherings even more special.
Mini Christmas cakes are easy to make and can be customized to suit your tastes. Whether you like a hint of brandy or prefer a non-alcoholic option, you can adjust the ingredients accordingly. The best part is that these cakes are perfect for any occasion, not just Christmas. You can enjoy them all winter long!
How to Make Mary Berry Mini Christmas Cakes
Making Mary Berry Mini Christmas Cakes is simple and fun. Let’s break down the process step by step, so you can enjoy making these amazing treats without any stress.
Ingredients
To prepare these delightful cakes, you will need the following ingredients:
- 175 g Butter (softened)
- 175 g Light Brown Soft Sugar
- 3 large Eggs (beaten)
- 175 g Self-Raising Flour
- 2 tsp Ground Mixed Spice
- 115 g Mixed Dried Fruit
- 2 tbsp Brandy or Orange Juice
- 115 g Icing Sugar
- 1-2 tbsp Warm Water
- Glacé Cherries (for decoration)
- Icing Holly Leaves (for decoration)
Directions
Baking Instructions
-
Preheat Your Oven: Start by preheating your oven to 160°C (320°F). This is an essential step to ensure your cakes bake evenly.
-
Prepare the Baking Tray: Line a mini cake tin or several small cupcake tins with baking paper. This will help the cakes come out easily once they are baked.
-
Cream the Butter and Sugar: In a large mixing bowl, cream together the softened butter and light brown sugar until it becomes light and fluffy. You can use an electric mixer or mix it by hand with a wooden spoon.
-
Add the Eggs: Gradually add the beaten eggs to the mixture. Make sure to mix well after each addition. This will help the eggs incorporate smoothly into the batter.
-
Combine the Dry Ingredients: In another bowl, sift together the self-raising flour and ground mixed spice. This ensures that the spices and flour are mixed evenly.
-
Mix Everything Together: Slowly fold the dry ingredients into the wet mixture. Be careful not to overmix, as this can make your cakes dense. Keep folding until everything is just combined.
-
Add the Dried Fruit: Gently fold in the mixed dried fruit and either brandy or orange juice. This adds flavor and moisture to your cakes.
-
Fill the Tins: Spoon the cake batter into the lined baking tins. Fill them about three-quarters full to allow room for rising.
-
Bake the Cakes: Place the tins in the preheated oven. Bake for approximately 20-25 minutes, or until the cakes are golden brown and a toothpick inserted into the center comes out clean.
-
Cool the Cakes: Once baked, remove the cakes from the oven and let them cool in the tins for a few minutes. After that, transfer them to a wire rack to cool completely.
-
Decorate the Cakes: Once the cakes are cool, prepare the icing. In a bowl, mix the icing sugar with warm water until you get a smooth paste. You can adjust the water as necessary for the desired consistency.
-
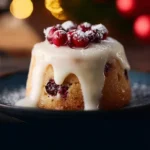
Ice the Cakes: Spread the icing on top of each cake. Use a spatula or a knife for a smooth finish. For decoration, place glacé cherries and icing holly leaves on top.
How to Serve Mary Berry Mini Christmas Cakes
Serving your mini Christmas cakes is as easy as pie! You can present them in various ways:
-
On a Platter: Arrange the decorated mini cakes on a festive platter. This creates an inviting display for your family and friends to enjoy.
-
As Individual Treats: Place each mini cake in its paper case and serve them separately. This is great for parties or gatherings where guests can grab their own treat.
-
With a Cup of Tea or Coffee: Pair these mini cakes with a warm beverage. They are perfect with tea or coffee, adding a comforting touch to your holiday snack time.
-
Gift Them: Wrap each mini cake in cellophane or place them in a decorative box to give as gifts. They make wonderful homemade treats to share with loved ones during the festive season.
No matter how you choose to serve them, these mini cakes are sure to be a hit!
How to Store Mary Berry Mini Christmas Cakes
Proper storage will help keep your cakes fresh and delicious. Here’s how to store them effectively:
-
Cool Completely: Before storing, make sure your cakes are completely cooled. This prevents condensation and keeps the icing from melting or getting soggy.
-
Use Airtight Containers: Place the mini cakes in an airtight container. This protects them from air exposure, which can make them dry out.
-
Keep in a Cool, Dry Place: Store the container in a cool, dry place away from direct sunlight. A cupboard or pantry is ideal.
-
Enjoy within a Week: For the best flavor and texture, aim to enjoy your mini cakes within a week. However, if you have not decorated them, they can last longer.
-
Freezing Option: If you want to keep them for a longer time, you can freeze the un-iced cakes. Wrap each cake tightly in cling film and then in foil before placing them in the freezer. Thaw them at room temperature when you’re ready to serve.
Tips to Make Mary Berry Mini Christmas Cakes
To ensure your baking experience is enjoyable and your cakes turn out perfectly, consider these handy tips:
-
Weigh Ingredients Accurately: Use a kitchen scale to measure your ingredients accurately. This will ensure the proper balance in your recipe and help the cakes turn out just right.
-
Use Room Temperature Ingredients: Make sure your butter and eggs are at room temperature before mixing. This helps create a smoother batter and better texture in your cakes.
-
Customize Your Fruits: Feel free to mix and match the dried fruits in the recipe. You can add raisins, currants, cranberries, or even nuts if you prefer a different flavor.
-
Adjust the Spice: If you love spices, you can add extra ground cinnamon or nutmeg to the mixture. This enhances the flavor, giving your cakes a more intense holiday taste.
-
Check for Doneness: Every oven is different. Check your cakes a few minutes earlier than the suggested time to prevent overbaking. The toothpick test is a reliable way to check if they are done.
Variation
While this recipe is delightful as it is, here are a few variations you can try:
-
Chocolate Mini Cakes: Substitute a portion of the flour with cocoa powder for a chocolate version. This adds a rich depth to the flavor.
-
Nut Free Version: If you have nut allergies to consider, simply skip adding any nuts or choose nut-free dried fruits.
-
Vegan Option: Replace butter with plant-based margarine and use flax eggs instead of regular eggs. These substitutions help create a vegan-friendly version of these cakes.
-
Different Glazes: Instead of a traditional icing, try a glaze made from orange juice or lemon juice mixed with icing sugar designed to soak into the cake. This makes for a moist and tangy treat.
FAQs
1. Can I make these cakes ahead of time?
Yes, absolutely! These mini cakes can be made a few days in advance. In fact, they often taste even better after a day or two as the flavors meld together. Just be sure to store them properly!
2. Can I use fresh fruit instead of dried fruit?
It’s best to stick with dried fruit for this recipe, as fresh fruit can add too much moisture, which may affect the structure of the mini cakes. Dried fruit provides the perfect balance of flavor and texture.
3. What is the best way to decorate them?
You can get creative with decorations! Besides glacé cherries and icing holly leaves, you can use edible glitter, small Christmas-themed chocolates, or even a dusting of powdered sugar for a snowy effect.
4. Is it possible to make these cakes gluten-free?
Yes, you can substitute the self-raising flour with a gluten-free baking blend. Just check that the blend has adequate leavening agents to help the cakes rise properly.
5. How can I tell if the cakes are done?
A toothpick inserted into the center of the cakes should come out clean or with just a couple of moist crumbs. If there’s batter stuck to the toothpick, the cakes need more time in the oven.
Making Mary Berry Mini Christmas Cakes is a delightful way to embrace the spirit of the holidays. With their rich flavors and beautiful presentation, they are sure to be a favorite among your family and friends. Celebrate this season by baking and sharing these lovely little treats that are packed with love and warmth. Happy baking!
PrintMary Berry Mini Christmas Cakes
Delightful mini Christmas cakes that are easy to make and perfect for holiday celebrations. Customizable and packed with festive flavors.
- Prep Time: 15 minutes
- Cook Time: 25 minutes
- Total Time: 40 minutes
- Yield: 12 servings 1x
- Category: Dessert
- Method: Baking
- Cuisine: British
- Diet: Vegetarian
Ingredients
- 175 g Butter (softened)
- 175 g Light Brown Soft Sugar
- 3 large Eggs (beaten)
- 175 g Self-Raising Flour
- 2 tsp Ground Mixed Spice
- 115 g Mixed Dried Fruit
- 2 tbsp Brandy or Orange Juice
- 115 g Icing Sugar
- 1–2 tbsp Warm Water
- Glacé Cherries (for decoration)
- Icing Holly Leaves (for decoration)
Instructions
- Preheat your oven to 160°C (320°F).
- Line a mini cake tin or small cupcake tins with baking paper.
- Cream together the butter and light brown sugar until light and fluffy.
- Gradually add the beaten eggs, mixing well after each addition.
- Sift together the self-raising flour and ground mixed spice in a separate bowl.
- Fold the dry ingredients into the wet mixture carefully.
- Gently fold in the mixed dried fruit and brandy or orange juice.
- Spoon the cake batter into the lined tins, filling them three-quarters full.
- Bake for approximately 20-25 minutes until golden brown and a toothpick comes out clean.
- Cool in the tins for a few minutes, then transfer to a wire rack to cool completely.
- Mix icing sugar with warm water until smooth and spread on top of each cooled cake.
- Decorate with glacé cherries and icing holly leaves.
Notes
For best flavor, enjoy within a week. These cakes can also be wrapped and frozen for longer storage.
Nutrition
- Serving Size: 1 cake
- Calories: 250
- Sugar: 15g
- Sodium: 150mg
- Fat: 10g
- Saturated Fat: 5g
- Unsaturated Fat: 3g
- Trans Fat: 0g
- Carbohydrates: 35g
- Fiber: 1g
- Protein: 4g
- Cholesterol: 50mg